ComMarker has recently launched the ComMarker Omni X/XE, along with its newly developed ComMarker Studio laser engraving software. While the software offers a variety of fonts, some users have expressed interest in expanding their font selection and making text more personalized. Fortunately, it’s easy to download and use your favorite fonts. In this article, we’ll guide you through the steps to add custom fonts and create italic text using ComMarker Studio.
How to Add Custom Fonts to ComMarker Studio?
ComMarker Studio is a versatile software that works seamlessly with the ComMarker Omni X/XE laser engraver. However, some users find the default font selection limiting, especially if they wish to use more creative or unique fonts for their engraving projects. The good news is that you can easily expand your font library by adding custom fonts to ComMarker Studio.
Steps to Add Custom Fonts:
-
Download Your Favorite Font: There are countless free and paid fonts available online. Websites like Google Fonts or DaFont offer a wide range of options. After finding the perfect font, download the font file (usually in .ttf or .otf format).
-
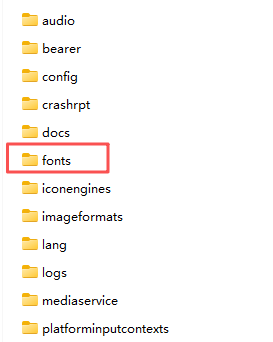
Locate the ‘Fonts’ Folder: Once you’ve downloaded your font, navigate to the folder where ComMarker Studio is installed. Inside, you’ll find a subfolder named “fonts.”
-
Copy the Font File: Copy the downloaded font file and paste it into the “fonts” folder within the ComMarker Studio directory.
-
Restart ComMarker Studio: After adding the new font, restart the software to ensure it loads the newly added font. When you reopen the software, your custom font should appear in the list of available fonts for engraving.
With just a few simple steps, you’ll be able to expand your font options, allowing you to create more personalized and stylish text for your laser engraving projects.
How to Create Italic Text in ComMarker Studio?
Sometimes, you might want to create italicized text to add emphasis or style to your engraving projects. While ComMarker Studio doesn’t offer a specific “Italic” option, you can easily create italic text by manually adjusting the text’s angle.
Steps to Create Italic Text:
-
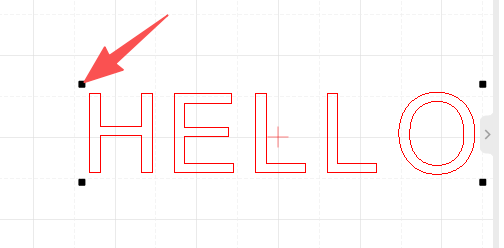
Enter Text on the Canvas: Start by typing any text you’d like to make italic. This can be done by selecting the text tool and typing on the canvas.
-
Select the Text: Once your text is on the canvas, click on any of the black squares appear around the text box.
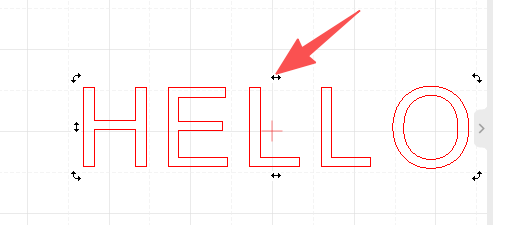
3. Drag the Corner Arrow: After clicking, the black squares will change into black bidirectional arrows.
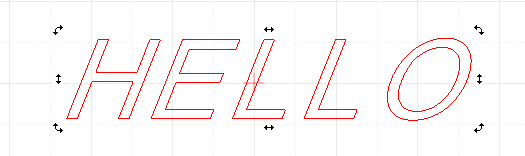
4. Adjust the Text Angle: Drag the middle arrow to tilt the text to the left or right. This will make the text appear italicized. You can adjust the degree of tilt to achieve the desired slant for your text.
By following these simple steps, you can easily create italic text in ComMarker Studio, adding that extra flair to your engraving designs.
Conclusion:
ComMarker Studio offers powerful features for laser engraving, and with just a few tweaks, you can customize the fonts and text styles to suit your needs. Whether you want to add a unique font to your project or create beautiful italicized text, the process is simple and user-friendly. Expand your design possibilities and elevate your engraving projects with the added flexibility of custom fonts and italic text.
ComMarker’s dedication to user-friendly software makes laser engraving even more versatile, ensuring that your designs are as personal and unique as possible. Try adding custom fonts and italic text today and take your laser engraving projects to the next level!