Laser engraving is a precise art form that relies on understanding both your machine’s capabilities and the material you’re working with. For users of the ComMarker Omni X/XE, understanding when and how to conduct a material test is crucial for achieving optimal engraving results. Whether you’re engraving wood, metal, glass, or acrylic, different materials require unique settings for the best results. That’s where the material test comes into play.
In this blog, we’ll dive into when to use a material test, why it’s important, and how to perform it efficiently in ComMarker Studio and LightBurn
What is a Material Test in Laser Engraving?
A material test is essentially a way to calibrate and fine-tune the engraving parameters for different materials. Laser engraving involves using varying levels of power, speed, frequency, and other settings to achieve different effects on the surface of materials. However, not all materials respond the same way to these settings, and the laser engraving process can differ based on factors such as:
-
Material Type: Wood, acrylic, glass, and metals all have different densities and reflectivity, making them respond to laser power in different ways.
-
Surface Finish: Materials with glossy or matte finishes require distinct settings.
-
Engraving Depth: Some materials need shallow engraving for aesthetic purposes, while others may need deeper cuts for specific designs.
By performing a material test, you can determine the optimal settings for a given material before committing to an entire project.
When Should You Conduct a Material Test?
You should perform a material test in the following situations:
-
Trying New Materials: Every new material you use—whether it’s a different type of acrylic, a new wood, or an unfamiliar metal—should be tested first. While materials like wood may engrave similarly, different types of wood (such as pine vs. oak) can react differently to the laser.
-
Adjusting Machine Settings: If you’ve made adjustments to your Omni X/XE machine, such as changing the lens or altering the laser power, a material test will help you ensure that your new setup still works well with your materials.
-
Changing Engraving Effects: If you’re looking to achieve different engraving effects, such as changing from surface etching to deeper engraving, it’s vital to run a material test. This helps ensure that the laser’s power is strong enough to achieve the effect but not so strong that it damages the material.
-
Unknown Performance with Coated or Treated Materials: Materials that have been treated, coated, or have specific finishes may behave differently than untreated or raw materials. Conducting a test allows you to adjust accordingly and achieve the desired results.
How to Perform a Material Test in ComMarker Studio
Now that we understand when and why a material test is necessary, let’s walk through how to perform a material test using ComMarker Studio and the ComMarker Omni X/XE UV laser engraver.
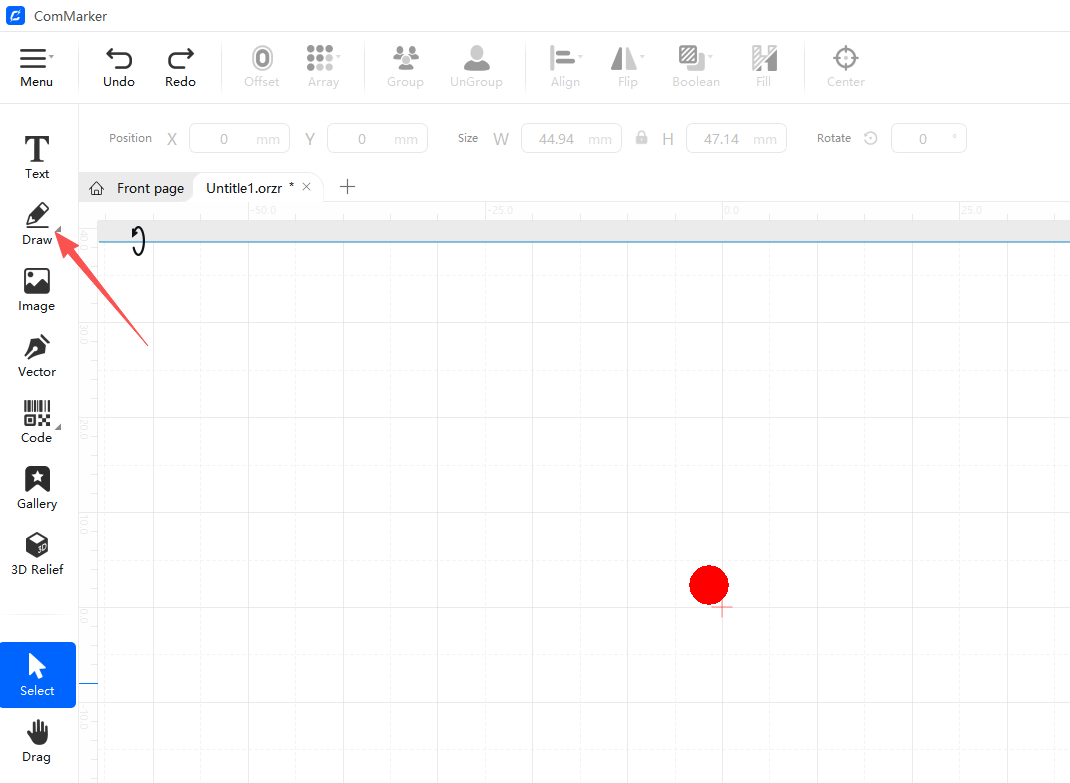
Step 1: Draw a Test Pattern
The first step in creating a material test is to prepare a small test pattern. In ComMarker Studio, you can do this by drawing a small circle or square. These simple shapes will help you assess how the laser interacts with the material and allow you to make any necessary adjustments.
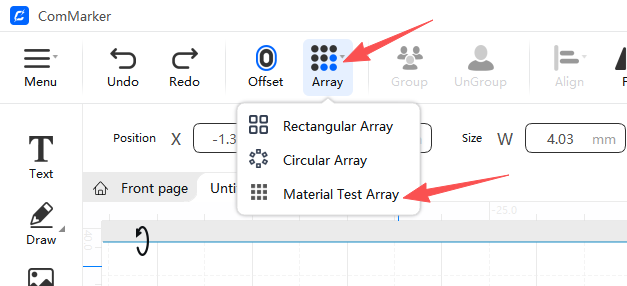
Step 2: Use the Material Test Array
Once you’ve drawn your test pattern, use the Material Test Array feature in ComMarker Studio to create multiple test patterns. Here’s how:
-
Click on Array in the software menu.
-
Select Material Test Array from the dropdown.
-
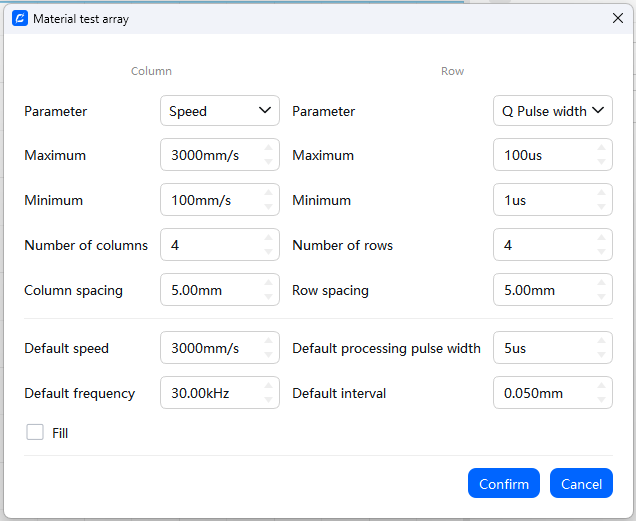
You’ll then be prompted to enter column and row parameters based on your test area size. Depending on the material you’re testing, you may want to use a larger or smaller test grid to evaluate different settings across various parts of the material.
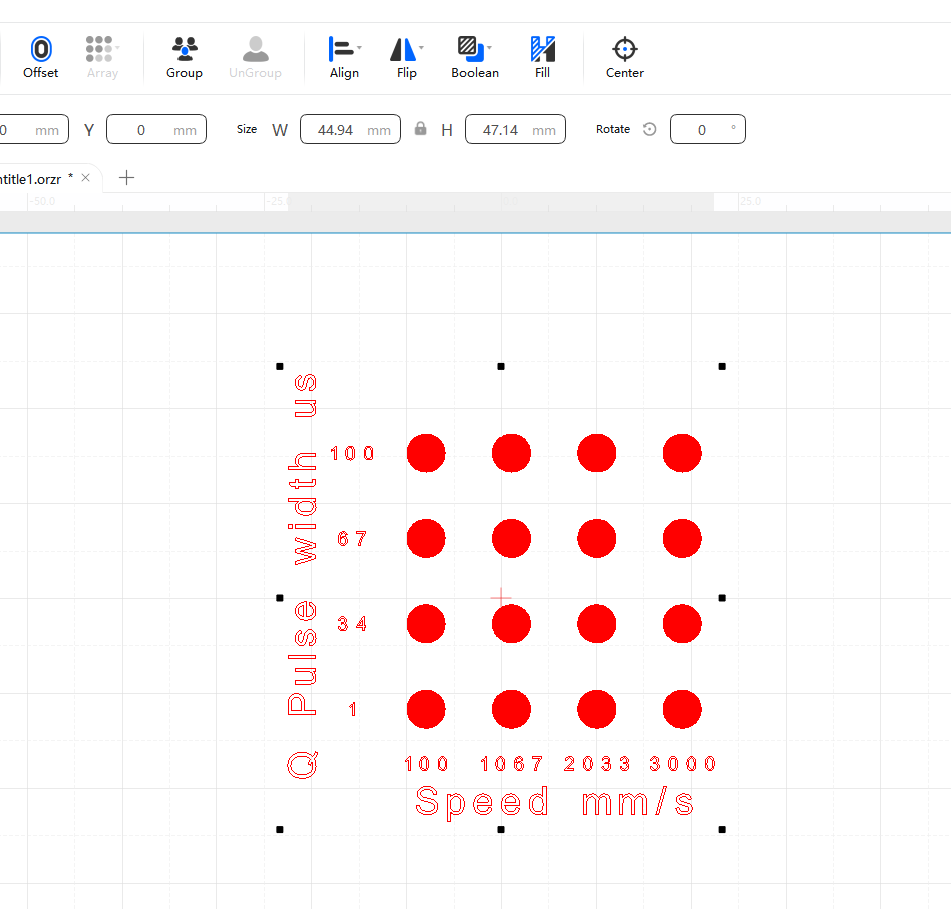
Step 3: Adjust Parameters
Once your test array is created, you can adjust the parameters for each test area. For example:
-
Speed: Lower speeds will typically create deeper engravings, while higher speeds will result in lighter engravings.
-
Power: Higher power will make the laser burn deeper into the material, while lower power creates lighter engravings.
-
Frequency: This controls the rate at which the laser pulses, affecting the smoothness of your engraving.
-
Q-Pulse: This determines the strength of each pulse of the laser.
As you adjust these settings, remember that each material requires a different combination of speed, power, and frequency.
Step 4: Run the Test
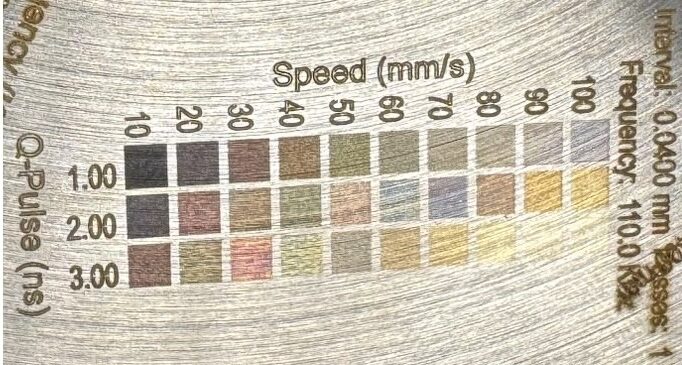
Once your settings are adjusted, run the test. After the engraving is complete, assess how the laser performed on your material. Look for the following:
-
Quality of Engraving: Is the engraving clear and detailed, or is it too shallow or too deep?
-
Consistency: Does the engraving look the same across all areas of the material? Ensure that the laser’s settings are consistent across the test array.
-
Surface Finish: Check if the engraving has affected the material’s surface, leaving any unwanted marks or burn marks.
Step 5: Adjust and Finalize
If you’re satisfied with the results, proceed with the engraving on the full piece. If not, adjust the parameters based on your observations from the test. Repeat the process until you’re confident in your settings.
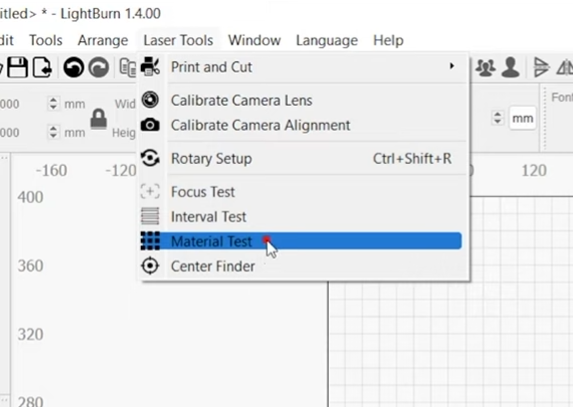
How to Perform a Material Test in LightBurn
If you prefer LightBurn, material test is on the top left corner.
Why Do You Need a Material Test?
Even if you’re already familiar with your ComMarker Omni X/XE and its settings, testing a material before running the full engraving can help you avoid several common issues:
-
Inconsistent Engraving: Materials may not always behave as expected under specific settings, leading to uneven or poor-quality engravings. A material test allows you to spot any issues early on.
-
Wasted Materials: Material tests allow you to adjust the settings in small areas before engraving the entire piece, preventing wasted material if the settings aren’t ideal.
-
Precise Control: Every material has its own ideal combination of speed, power, and frequency. Material tests help you identify the right balance for each type of material, ensuring that you get the results you expect.
-
Maximizing Efficiency: By identifying the best settings through a test, you can optimize your process, saving time and reducing the trial and error that would otherwise occur when engraving an entire piece.
Conclusion
Using a material test in ComMarker Studio is a simple yet powerful way to ensure that your UV laser engraving results are optimal. By understanding the significance of material tests and following the right steps, you can save time, reduce errors, and achieve consistent and precise engravings on a wide variety of materials.
Make the most of your ComMarker Omni X/XE and ComMarker Studio by incorporating material tests into your workflow for flawless, professional results every time.