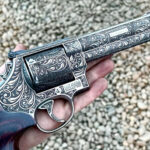
Best laser for glass engraving is usually associated with UV laser engravers and CO2 Laser Engravers designed specifically for the job, especially when high clarity and smooth detail are important. But if you already own a fiber laser engraver and want to engrave glass without investing in another setup, there are still reliable ways to get clean, visible results.
In this guide, we’ll walk through a practical method for engraving glass with a fiber laser, including the preparation steps that make the biggest difference in contrast and consistency.

How to Make a Fiber Laser Available for Glass Laser Engraving?
Most fiber lasers operate around 1064 nm, a wavelength that glass does not absorb efficiently. By applying a dark paint or coating to the surface, the coating absorbs the laser energy and converts it into heat. That localized heat transfer creates micro-fractures or removes the coated layer on the glass surface, producing a visible engraved effect.
What You’ll Need
1.Glass item—anything from flat panels to wine bottles.
2.Rust-Oleum 2X paint (Ivory Silk or flat white)—temporary marking layer.
3.Paint sprayer or aerosol—for even coverage.
4.Paint thinner—for post-engraving cleanup.
5.ComMarker fiber laser engraver—we recommend a MOPA fiber laser for pulse adjustment

Step 1: Prep & Paint Your Glass
Clean thoroughly—remove oils, fingerprints, and dust with isopropyl alcohol.
Spray a thin, even coat of Rust-Oleum 2X Ivory Silk (or flat white) over your engraving surface.
• Hold can 8–12 inches away for a fine mist.
• Rotate bottles or move panels to avoid drips.
Let it dry completely—at least 15–20 minutes in a dust-free area.
Optional second coat if coverage is uneven.
Why Rust-Oleum? Its flat finish absorbs laser energy consistently, so you’ll get uniform etches without glaze or hotspots.

Step 2: Laser Settings & Focusing
With your glass painted and dry, it’s time to dial in your ComMarker settings:
Glass laser engraving settings for 60W MOPA fiber laser engraver: Speed 190mm/s, Power 90%, Freq 252, Pulse 50 , line spacing 0.049
1.Focus your laser engraver on the painted surface.
2.Place a backing underneath flat items and fill hollow objects (like bottles or cups) with paper to absorb the laser and prevent unintended marking on surfaces below.
3.Run a quick test on scrap glass or painted tile with a small circle to verify contrast.
4.Adjust power in 5 % increments if your etch is too shallow or too dark (risks chipping the paint).

Step 3: Engrave & Clean Up
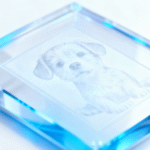
1.Engrave your design—vector cut or bitmap hatch. The laser vaporizes the paint layer, exposing the frosted glass below.
2.Wipe away the remaining paint with a lint-free cloth dampened in paint thinner or acetone.
3.Rinse and dry the glass to remove any residue.
The result? A crisp white frosted design that’s fully bonded into the glass surface.

Pro Tips for Spectacular Results
Keep it thin: Thick paint layers can lead to uneven etching or flaking.
Mind the edges: Avoid painting over curved or lip areas—focus on the flat center for best focus.
Test small: Always run a 10 × 10 mm test square to fine-tune settings before your final piece.
Safety first: Fiber laser break glass easily, therefore wear laser-safe goggles when engraving glass with fiber laser engraver.

Why Choose ComMarker for Glass Engraving?
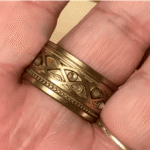
ComMarker fiber lasers are built for high-precision metal engraving, while also performing well across materials like leather, stone, and certain plastics, and they’re capable of glass surface engraving and even more materials with the right setup. But fiber laser glass cutting has challenges.
For more advanced glass applications, such as inner engraving and precision cutting, ComMarker also offers dedicated UV laser to engrave glass, designed to deliver exceptional detail and control on transparent materials.
Whether you’re working across multiple materials or exploring creative glass designs, ComMarker gives you the flexibility to expand what your laser can do.
Ready to elevate your engraving capabilities? Explore our full range of fiber and UV laser solutions.